Mindjet MindManager review Shape your project with greater ease with MindManager’s many new features
OUR VERDICT
Mindjet has brought great new features to MindManager which will make your job easier, more pleasant and help you create a better looking end product.
FOR
- New Templates
- Tags and Icons for instant visual feedback
- Better shapes
- Great export option
AGAINST
- No complete feature parity between Mac and Windows
Mind mapping software is a great way to visualise and organise your projects, whether you’re on your own or as part of a team.
Mindjet MindManager (owned by Corel) is filled with useful additions which will make it easier to visualise and categorise your information, and do this in new and interesting ways..
Let’s take a look at some of them.
- Want to try Mindjet Manager? Check out the website here

New templates
As you create new projects, you’ll appreciate the inclusion of new templates and themes. You can select and change the layout at any time to see how the data on display looks. The choice of themes has been greatly expanded since the last version (those colours are still available if you prefer them) and Corel has included a handful of new stylistic themes, if you like a more casual approach to your displayed topics.

New views
Two new powerful views are being introduced: Tag View and Icon View.
When you switch to either of these, the information you have in your project is shunted to the left and you’re faced with a series of columns in the rest of the interface.
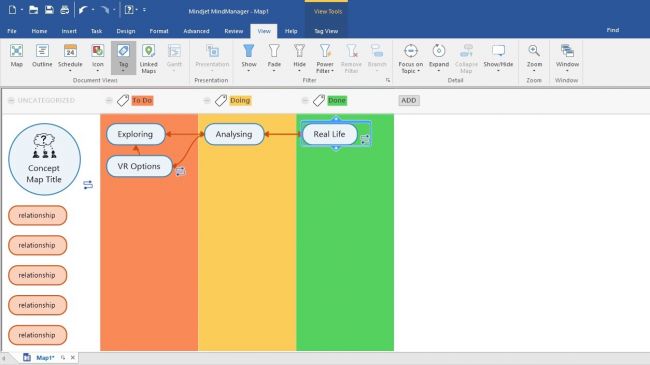
Tag view lets you drag items from your project into one of those columns. As you do, that column’s tag is added to each of your ideas. You can move them from column to column at will, and even reorder your content within those columns as you see fit. The title of these columns can be altered, as can their colour. You can add or delete new ones, and even reorder entire columns to suit your needs.

The same applies to Icon view, but in this case you can add various icons to each item. This can be flags, or arrows, or even emojis – whatever you need to mark your ideas in specific ways.
When you go back to the Map View, all this information is preserved and everything is tagged appropriately based on the importance you gave each idea and any icons you added to them.
If you need a quick colourful way to visualise your content and alter those tags as your project progresses, you’ll find this new feature very useful and easy to use.
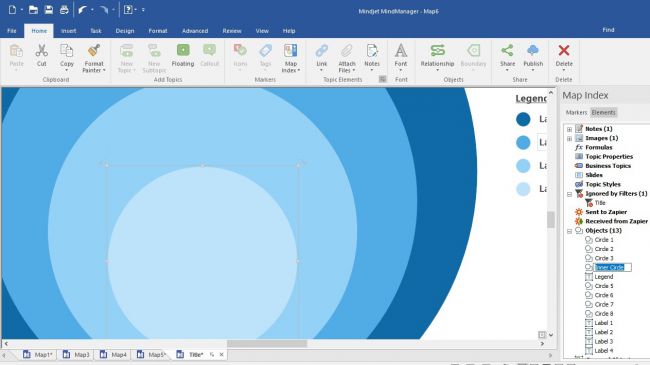
New shapes
MindManager introduced a handful of shapes which you could add to your project. This concept has been greatly expanded to offer you a lot more versatility.
For instance, There are what Corel calls ‘smart shapes’, shapes which you can alter the number of levels in each. These are funnels and matrices, which are essentially tables and cells as you’d be used to in a spreadsheet document.Advertisement
It’s possible to add shapes as backgrounds to a project or as boundaries in workflow diagrams.
Another welcome addition is the ability to rename shapes. This enables you to locate them more easily in the Elements section of the Map Index.
But adding more and more shapes to a project can make it unwieldily, especially if you need to make changes to them. This is where Grouping comes in. When multiple shapes are grouped into one, you can move, resize and edit them all in one go, greatly speeding up the process.
We did particularly like the ability to resize all selected topics so their dimensions match, leading to a cleaner more elegant display. This can all be done from the Format Section.
We also appreciated the editing possibilities that are included. With these tools, it’s easy to align the shapes together, rotate and resize them.
Smart rules
Putting information on a page is one thing, having that information update automatically as you move it to different areas, is something else entirely.
MindManager allows you to add specific triggers to topics that do just that. When this formatting capability is enabled, you can see your options in a section on the left hand side.
Such rules allow for the data to change as you interact with it. For instance, as you move a topic from one branch to another, specific triggers can be actioned to change its appearance and graphically indicate how that topic is progressing over time.
Even better, the rules you create can be stored in a library so when you create a new project, you don’t need to reinvent the wheel and can draw on a list of triggers you created to give you projects not only a consistent look, but this also allows you to create them much quicker.

Exporting
When it comes to exporting your project, the HTML5 format is pretty sweet. Everything you’ve added to your project can be viewed inside a web browser upon export. And what’s great is how completely interactive the interface actually is. You can expand topics and collapse them, open sections up just as if you were in MindManager. The only thing you can’t do is alter the map: it’s read only.
You can however also filer your content. The filter options allow you to show topics, hide them or simply fade them giving you great visual control of all the information stored in your project.
Mac-lite
Corel have been making a push to bring many of its app to the Mac, and MindManager is in fact compatible with both platforms – Macs and Windows. However, there is no feature parity and most of the new features haven’t been implemented in the Mac version.
Considering the push Corel has made in their graphic apps, it’s a shame the Mac is still not viewed as a proper business tool worthy of the latest and greatest, which is odd since many of the new features are all about design and improving the look of your data – something which is generally associated with more creative types… who tend to prefer the Mac as a platform…
Final verdict
As it stands for now, if you want to explore all the great features mentioned in this review and more besides, it’s best to take the 30-day free trial on a Windows machine.
- Also check out the best mind map software